Introduction to No Bake Chocolate Eclair Cake Recipe
As a passionate home cook, I’ve always been drawn to the magic of desserts that require little effort but deliver big flavors. Enter the No Bake Chocolate Eclair Cake Recipe—a treat that brings back fond memories of summer gatherings and family celebrations. It’s like a sweet hug on a plate, whispering promises of creamy layers and luscious chocolate that dance on your taste buds.
Growing up, I remember my grandma making her famous eclair cake. She would gather us all around the kitchen, the aroma of vanilla and chocolate swirling like a gentle breeze. As we sat at the table, we would all eagerly anticipate the moment we could dig in. That sense of community and shared joy has stuck with me, and now I love recreating that magic in my own kitchen.
What I adore about this recipe is its simplicity. With no need for an oven, it’s perfect for those hot summer days when the last thing I want to do is heat up the house. Just a handful of ingredients—graham crackers, pudding, and a rich chocolate glaze—come together to form a delightful dessert that feels fancy but is surprisingly easy to make.
So, whether you’re planning a picnic, a birthday party, or just a cozy night in, this No Bake Chocolate Eclair Cake is sure to impress. Trust me, once you serve it, you’ll be the star of the dessert table! Let’s dive into the layers of deliciousness and get started on this delightful recipe together.
Ingredients for No Bake Chocolate Eclair Cake Recipe
Gathering the right ingredients is like collecting the perfect tools for a painter. Each one plays a vital role in creating the masterpiece that is the No Bake Chocolate Eclair Cake. Below, I’ve detailed everything you’ll need to whip up this delightful dessert. Don’t worry; it’s all quite simple and straightforward!
Main Ingredients
- 2 (3.4 oz) packages of instant vanilla pudding mix
- 4 cups of milk
- 1 (8 oz) container of whipped topping (like Cool Whip)
- 1 box of graham crackers (about 14 oz)
- 1 cup of powdered sugar
- ½ cup of unsweetened cocoa powder
- ½ cup of butter (unsalted, for the chocolate glaze)
- 1 teaspoon of vanilla extract (for an extra touch of flavor)
When choosing your ingredients, I always recommend going for high-quality products. For instance, opt for real vanilla extract instead of imitation for a richer flavor. And if you can find organic or non-GMO graham crackers, they add a lovely touch to your creation.
Optional Add-ons
- Chocolate chips or shaved chocolate for garnish
- Fresh berries (like strawberries or raspberries) for a fruity twist
- Caramel sauce for drizzling
- Chopped nuts (such as pecans or walnuts) for added crunch
These optional add-ons can elevate your eclair cake to new heights! I love adding fresh berries on top; they not only look beautiful but also add a burst of freshness that contrasts wonderfully with the rich chocolate. Feel free to get creative and make this recipe your own!
How to Prepare No Bake Chocolate Eclair Cake Recipe
Now that we have all our ingredients ready, it’s time to turn our kitchen into a sweet haven! This part is where the magic truly happens. Preparing the No Bake Chocolate Eclair Cake is as simple as layering your favorite flavors, and I can’t wait to share the steps with you. Let’s get started!
Step 1: Prepare the Cream Layer
First things first, let’s create that creamy filling that makes this cake so delightful. In a large mixing bowl, whisk together the instant vanilla pudding mix and milk. Mix until smooth and creamy. Then, gently fold in the whipped topping until everything is nicely combined.
Tips for Step 1
- Use cold milk for a fluffier texture; it helps the pudding set perfectly.
- Be gentle when folding in the whipped topping. You want to keep that light, airy texture!
Step 2: Assemble the First Layer of Graham Crackers
Once your cream layer is ready, it’s time to start layering! Grab a 9×13 inch baking dish and arrange a single layer of graham crackers at the bottom. I like to break some crackers into smaller pieces to fill in any gaps. It makes for a nice, even base.
Tips for Step 2
- Don’t worry about making the layer perfect. It’s all about loving the process!
- For added flavor, you can lightly brush the graham crackers with a little milk to soften them.
Step 3: Add the Cream Mixture
Now, scoop your luscious cream mixture over the layer of graham crackers. Spread it evenly using a spatula, ensuring each cracker is covered. The cream should feel like a fluffy cloud resting on top.
Tips for Step 3
- Use a spatula or the back of a spoon to smoothly spread the cream. It makes it look nice and neat!
- Feel free to add a sprinkle of chocolate chips in this layer for a little surprise!
Step 4: Repeat Layering Process
Next, it’s time to repeat! Add another layer of graham crackers on top of the cream mixture, followed by another layer of the cream. You can do this two or three times, depending on how tall you want your cake to be. I love a good tall cake—it feels so indulgent!
Tips for Step 4
- Make sure to end with a layer of cream on top for that beautiful finish.
- Take your time and enjoy the process. It’s all about creating something special!
Step 5: Prepare the Chocolate Topping
Now comes the grand finale—the chocolate topping! In a small saucepan, melt the butter over medium heat. Stir in the cocoa powder and powdered sugar until smooth. Slowly add a little milk until you reach your desired consistency. Drizzle this dreamy chocolate glaze over the top layer of cream.
Tips for Step 5
- Make sure the chocolate glaze is not too hot when pouring it on, as it might melt the cream layer underneath.
- For a richer flavor, add a splash of vanilla extract to the chocolate mixture!
Step 6: Chill Before Serving
Finally, it’s time to let your creation chill. Cover the baking dish with plastic wrap and place it in the refrigerator for at least 4 hours, or overnight if you can wait! This step allows the flavors to meld beautifully.
Tips for Step 6
- The longer you chill, the more the flavors develop. Trust me; it’s worth the wait!
- When ready to serve, let it sit at room temperature for about 10 minutes for easier slicing.
And there you have it! Your No Bake Chocolate Eclair Cake is ready to dazzle friends and family. I can already hear the oohs and aahs when they take that first bite!
Equipment Needed for No Bake Chocolate Eclair Cake Recipe
Before we dive into making this delicious No Bake Chocolate Eclair Cake, let’s talk about the equipment you’ll need. Don’t worry; you won’t need anything fancy! Most of the tools are likely already in your kitchen. Here’s a quick list to get you started:
- 9×13 inch baking dish: This is where all the magic happens. If you don’t have one, a similar-sized dish will work just fine.
- Mixing bowls: You’ll need at least two bowls—one for the cream mixture and one for the chocolate topping. I always find that having a large bowl for the cream and a smaller one for the glaze makes the process smoother.
- Whisk: A good whisk is essential for combining the pudding and milk. If you don’t have a whisk, a fork works in a pinch!
- Spatula: This handy tool is perfect for spreading the cream mixture evenly. A silicone spatula is my favorite because it’s flexible and easy to clean.
- Measuring cups and spoons: Accurate measurements are key to achieving that perfect taste, so don’t skip these!
- Small saucepan: You’ll need this for melting the butter and mixing the chocolate glaze. A non-stick pan makes cleanup a breeze.
And there you have it! With these simple tools, you’re all set to create your No Bake Chocolate Eclair Cake. Cooking should be fun, and using the right equipment makes everything so much easier. Let’s keep the momentum going and jump back into the layers of deliciousness!
Variations of No Bake Chocolate Eclair Cake Recipe
One of the things I absolutely love about the No Bake Chocolate Eclair Cake is its versatility! You can easily switch things up to suit your taste or the occasion. Here are a few fun variations that I’ve tried and absolutely enjoyed:
- Chocolate Mint Eclair Cake: Add a splash of peppermint extract to the cream layer for a refreshing twist. Top it off with crushed mint chocolates for an extra layer of flavor.
- Caramel Eclair Cake: Replace the chocolate glaze with a rich caramel sauce. The combination of creamy vanilla, graham crackers, and caramel is simply divine!
- Fruit-Filled Eclair Cake: Layer in some sliced bananas or strawberries between the cream and graham crackers. This adds a fresh and fruity surprise to every bite!
- Nutty Chocolate Eclair Cake: Incorporate crushed nuts like pecans or walnuts into the cream layer for a delightful crunch. It adds texture and richness to the overall dessert.
These variations not only keep things exciting but also allow you to showcase your creativity. I love experimenting with flavors, and these twists on the classic recipe have become family favorites at my gatherings. So, don’t hesitate to make this recipe your own and have fun with it!
Cooking Notes for No Bake Chocolate Eclair Cake Recipe
As I’ve journeyed through countless kitchen adventures, I’ve picked up a few cooking notes that can help elevate your No Bake Chocolate Eclair Cake to new heights. These little tips can make a big difference, trust me!
- Timing is Key: While the recipe calls for chilling the cake for at least 4 hours, if you can let it sit overnight, do it! The flavors deepen and the texture becomes even creamier.
- Freshness Matters: Always check the expiration dates on your pudding mix and whipped topping. Fresh ingredients will give you the best flavor and texture.
- Softening Cream: If your whipped topping is frozen, let it thaw in the fridge for a few hours before using. It keeps the mixture light and airy, which is essential for that dreamy cream layer.
- Slice with Ease: Use a sharp knife to cut clean slices. For an even cleaner cut, dip the knife in warm water before slicing, then wipe it dry.
- Storing Leftovers: If you happen to have any leftovers (which is rare!), store them in the refrigerator for up to three days. Just cover it well to prevent it from absorbing other flavors.
These cooking notes are like little gems I’ve gathered along the way. They can help you navigate this delightful recipe with ease. Remember, every kitchen adventure is a chance to learn and create something special!
Serving Suggestions for No Bake Chocolate Eclair Cake Recipe
Now that your No Bake Chocolate Eclair Cake is ready to shine, let’s talk about how to serve it up! Presentation can elevate any dish, and this cake is no exception. Here are a few delightful serving suggestions that I’ve found to be crowd-pleasers:
- Individual Portions: For a fun twist, slice the cake into squares and serve them in cupcake liners. This makes for a cute and portable dessert, perfect for picnics or parties!
- Garnish with Fresh Fruits: Top each slice with fresh berries like strawberries or raspberries. Their vibrant colors and juicy flavors contrast beautifully with the rich chocolate and creamy layers.
- Chocolate Drizzle: For an added touch of elegance, drizzle extra chocolate sauce over the top right before serving. It’s like putting a cherry on top—completely irresistible!
- Serve with Whipped Cream: A dollop of whipped cream on each slice adds an extra layer of creaminess. It’s a simple yet delightful addition that everyone will love.
- Pair with Coffee or Tea: This cake pairs wonderfully with a warm cup of coffee or a soothing herbal tea. The flavors meld perfectly, making it the ideal end to any meal.
These serving suggestions not only enhance the visual appeal of your cake but also create a memorable experience for your guests. I can’t wait for you to share this delightful creation and enjoy the smiles it brings!
Tips for Perfecting No Bake Chocolate Eclair Cake Recipe
As I’ve spent time perfecting my No Bake Chocolate Eclair Cake, I’ve gathered a treasure trove of tips that can help you elevate your dessert to the next level. These small but mighty tricks can make all the difference, trust me!
- Chill Your Tools: Before you start, pop your mixing bowls and whisk in the freezer for a few minutes. Chilled tools can help your cream mixture whip up fluffier and smoother.
- Layer with Love: When layering your graham crackers, feel free to vary the arrangement—overlapping them slightly can create an even more delightful texture.
- Don’t Rush the Chill: I know it’s hard to wait, but letting your cake chill overnight will yield the best results. The flavors meld together beautifully, creating a cake that’s simply divine.
- Experiment with Flavor: Try adding a splash of almond extract to your cream layer for a nutty twist. It’s a little change that can transform the overall taste!
- Use a Serrated Knife: For clean slices, a serrated knife works wonders. It glides through the layers without squishing them down, ensuring every piece looks as good as it tastes.
With these tips in your back pocket, you’ll feel like a pro in no time! Each little detail adds up to create a delightful experience that you—and your guests—will cherish. Happy baking!
Breakdown of Time for No Bake Chocolate Eclair Cake Recipe
Timing is everything in the kitchen, especially when crafting a delightful dessert like the No Bake Chocolate Eclair Cake. Whether you’re juggling family activities or planning a gathering, knowing how long each step takes can really help you stay organized. Here’s a quick breakdown of the time needed:
- Prep Time: Approximately 30 minutes. This includes gathering your ingredients, mixing the cream layer, and layering the graham crackers and cream.
- Chilling Time: At least 4 hours. For the best flavor and texture, I recommend chilling it overnight. It’s worth the little extra wait!
- Total Time: Around 4 hours and 30 minutes (or overnight if you choose). This allows you to enjoy the preparation while letting your cake chill and set perfectly.
By keeping this timeline in mind, you can efficiently plan your baking day. I often find that preparing the cake in the morning allows me to enjoy it later in the evening, making it a sweet reward for a busy day. Happy baking, and enjoy every moment of this delicious journey!
Nutritional Information for No Bake Chocolate Eclair Cake Recipe
While I believe that indulging in a delightful dessert like the No Bake Chocolate Eclair Cake is all about enjoyment, it’s also good to be aware of its nutritional aspects. Here’s a basic breakdown of the nutritional information per serving, assuming you cut the cake into 12 portions. Keep in mind that these values can vary based on specific brands and ingredient choices:
- Calories: Approximately 250 calories
- Protein: 3g
- Carbohydrates: 35g
- Fat: 12g
- Saturated Fat: 7g
- Cholesterol: 20mg
- Sodium: 150mg
- Dietary Fiber: 1g
- Sugars: 15g
While this cake is certainly a treat, it’s important to enjoy it in moderation. I often find that a little slice goes a long way in satisfying my sweet tooth. Plus, with a few optional add-ons like fresh berries or nuts, you can add some extra nutrients and make each serving a little more wholesome. Remember, it’s all about balance and enjoying the sweet moments in life!
Frequently Asked Questions about No Bake Chocolate Eclair Cake Recipe
As I’ve shared my beloved No Bake Chocolate Eclair Cake with friends and family, I’ve noticed a few common questions pop up. It warms my heart to see curiosity about this delightful dessert! Here are some frequently asked questions that I hope will help you out:
Can I use homemade whipped cream instead of Cool Whip?
Absolutely! Using homemade whipped cream can add a lovely richness to your cake. Just make sure to whip it until soft peaks form, and gently fold it into the pudding mixture to keep that airy texture. It’s a delicious twist!
How long can I store leftovers?
If you have any leftovers (which is rare, trust me!), you can store the No Bake Chocolate Eclair Cake in the refrigerator for up to three days. Just cover it well with plastic wrap to keep it fresh. Enjoying it the next day is a treat!
Can I freeze this cake?
While I recommend enjoying it fresh, you can freeze the cake if needed. Just slice it into portions, wrap each piece tightly in plastic wrap, and then place them in an airtight container. To enjoy, allow it to thaw in the refrigerator overnight. The texture may change slightly, but it’ll still taste amazing!
What can I substitute for graham crackers?
If graham crackers aren’t your thing, you can use vanilla wafers or even crushed Oreos for a different flavor. Each option brings its own unique twist to the cake, so feel free to experiment!
Is this dessert suitable for a gluten-free diet?
You can make a gluten-free version by using gluten-free graham crackers or another suitable cookie base. Just check the labels to ensure all your ingredients meet gluten-free standards. It’s a great way to share this treat with everyone!
I hope these FAQs have answered some of your burning questions! If you have any more, don’t hesitate to reach out. I love exchanging kitchen tips and recipes with fellow cooking enthusiasts!
Conclusion on No Bake Chocolate Eclair Cake Recipe
As we wrap up our delightful journey into the world of the No Bake Chocolate Eclair Cake Recipe, I can’t help but feel a warm sense of nostalgia and excitement. This dessert is more than just a treat; it’s a joyful experience that brings people together. With its creamy layers and rich chocolatey goodness, it has a way of making every occasion feel special.
One of the best parts about this recipe is its simplicity. You don’t need to be a seasoned baker to whip up this gorgeous cake. With minimal preparation and no oven required, it’s perfect for busy days or impromptu gatherings. Plus, the versatility of flavors and toppings means you can easily make it your own!
Whether served at a birthday party, a family picnic, or a cozy night in, each bite is like a little celebration. The smiles and compliments from friends and family are truly rewarding, reminding us of why we love to cook and share. So, gather your ingredients, unleash your creativity, and let this No Bake Chocolate Eclair Cake become a cherished favorite in your home. Happy baking, and enjoy every delicious layer!
Print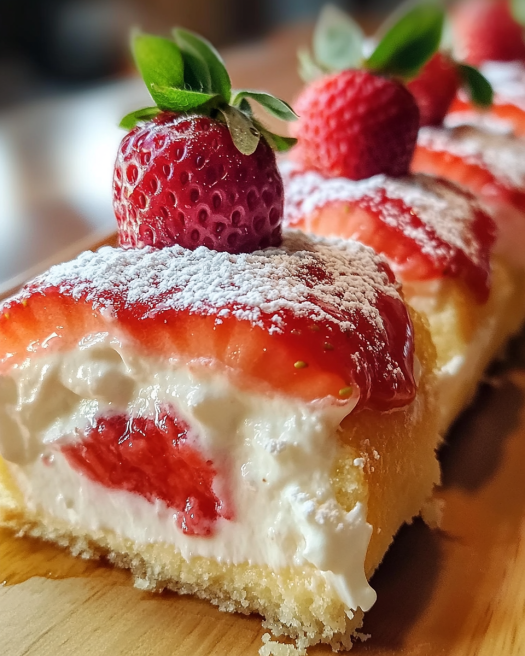
No Bake Chocolate Eclair Cake Recipe: A Must-Try Delight!
A delightful, no-bake chocolate eclair cake that features layers of creamy vanilla pudding and chocolate glaze, perfect for summer gatherings or any special occasion.
- Total Time: 4 hours and 30 minutes (or overnight)
- Yield: 12 servings 1x
Ingredients
- 2 (3.4 oz) packages of instant vanilla pudding mix
- 4 cups of milk
- 1 (8 oz) container of whipped topping (like Cool Whip)
- 1 box of graham crackers (about 14 oz)
- 1 cup of powdered sugar
- ½ cup of unsweetened cocoa powder
- ½ cup of butter (unsalted, for the chocolate glaze)
- 1 teaspoon of vanilla extract (for an extra touch of flavor)
Instructions
- Prepare the cream layer by whisking together the instant vanilla pudding mix and milk until smooth. Gently fold in the whipped topping.
- Assemble the first layer of graham crackers in a 9×13 inch baking dish.
- Add the cream mixture over the layer of graham crackers, spreading it evenly.
- Repeat the layering process with more graham crackers and cream mixture.
- Prepare the chocolate topping by melting butter, stirring in cocoa powder and powdered sugar, and adding milk to achieve desired consistency. Drizzle over the top layer of cream.
- Chill the cake in the refrigerator for at least 4 hours before serving.
Notes
- Chill overnight for best flavor.
- Use high-quality ingredients for optimal taste.
- Optional add-ons include chocolate chips, fresh berries, or nuts.
- Store leftovers in the refrigerator for up to three days.
- Prep Time: 30 minutes
- Cook Time: 0 minutes
- Category: Dessert
- Method: No Bake
- Cuisine: American
- Diet: Vegetarian
Nutrition
- Serving Size: 1 slice
- Calories: 250
- Sugar: 15g
- Sodium: 150mg
- Fat: 12g
- Saturated Fat: 7g
- Unsaturated Fat: 5g
- Trans Fat: 0g
- Carbohydrates: 35g
- Fiber: 1g
- Protein: 3g
- Cholesterol: 20mg
Keywords: no bake, chocolate eclair cake, dessert, creamy, easy recipe